Part 8 Gremlin
Overview
Gremlin is the python equivalent of the graphics window that Axis GUI uses to show the back plot and live plot. It allows the programmer to have a plot of the programmed path as well as the actual path. Gremlin is available as a GladeVCP widget but I preferred to unwrap it so to speak and use it as it was intended. It is assumed your using a 10.04 install from the LiveCD and have created at least one configuration so the directories are set up for LinuxCNC.
|
Note
|
This example is to show you how to incorporate gremlin into your GUI and does not contain a complete GUI with all the error checks etc. although it is pretty close to a working GUI. |
Setup
For now this tutorial is based on a 2.5 RIP (Run In Place) until a small patch is applied to 2.5. This can run on Master without a patch. The following steps will get the needed files and apply the patch.
-
Install Git
In the Synaptic Package Manager, select the package "git-core" (the package "git" is an unrelated program; don’t choose it). Optionally, select "gitk" or "qgit" (not on Dapper) to graphically view project history, and "git-gui" to graphically select files to commit.
-
Create an inital Git Checkout
Open a terminal and type the following command:
git clone git://git.linuxcnc.org/git/linuxcnc.git gui8
-
Checkout 2.5
In the terminal say:
git checkout -b v2.5_branch origin/v2.5_branch
git branch
After the git branch it should say v2.5_branch
-
Cherry Pick the Patch
This patch adds the error reporting left out of gremlin.py
git cherry-pick 14b1f7c1382938af23acda5679919121e2aacac5
Or if your brave just use Master.
-
Build the source files
The --enable build-documentation can be left off if you don’t want the docs installed.
cd gui8/src
./autogen.sh
./configure --enable-build-documentation
make
sudo setuid
Now we should have the source files built and ready to run.
-
Setup the environment This step sets up the environment for this terminal session to use the local files only. Each time you run your GUI you will need to do this.
cd ..
. ./scripts/rip-environment
-
Copy the Gui Files
You must copy the glade and python files to the RIP directory so LinuxCNC can find the files. Extract jtgremlin from the zip file and copy to the gui8/bin directory.
Next extract the jtgremlin.glade file from the zip file and copy to the gui8/share/linuxcnc directory.
-
Copy the Configuration Files
In your linuxcnc/configs directory create a new directory called jtgremlin. Extract the configuration files from the zip file and copy them to the jtgremlin directory.
-
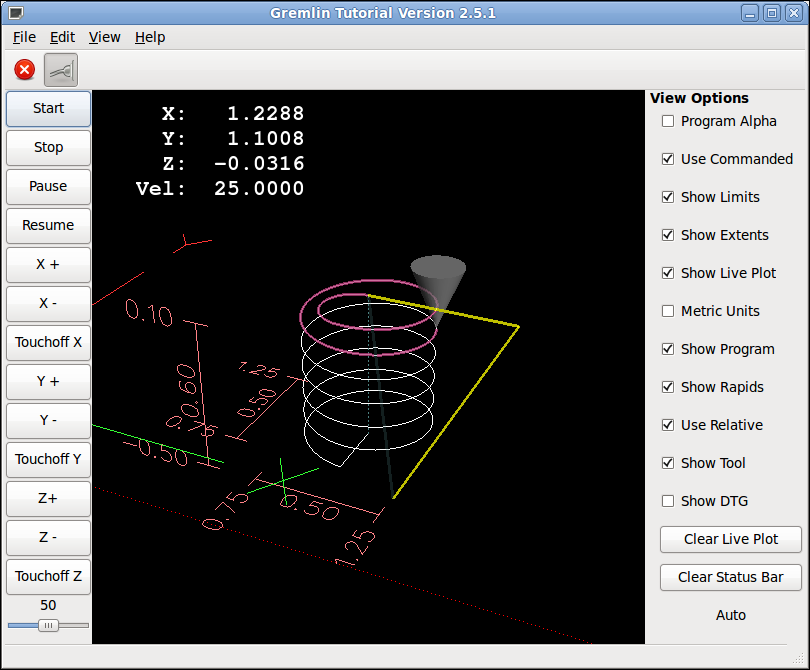
Run the Config
This tutorial will be a little backwards from the rest as we will get right to the end at the start and run the configuration then explain it.
In the same terminal that we ran the rip-environment scrip we will change to the configuration directory then run LinuxCNC with our example gremlin GUI.
cd ..
cd linuxcnc/configs/jtgremlin
linuxcnc jtgremlin.ini
The configuration should run and if you open a file it should run if your within the machine boundaries. If not touch off to move the tool to an appropriate position and touch off the axis. This is the G code file I used in the screen shot.